Summary: Dress up your Vostok Amphibia with a machined bezel and your choice of insert for a custom look!
UPDATE: Video added below: How to replace the bezel on a Vostok Amphibia!
Background
Only a Vostok Amphibia owner would think it logical to buy a $58.00 watch and immediately add a $40.00 strap, then spend another $70.00 or so on replacing the bezel!
But it’s all part of the fun and if the Amphibian wasn’t such a good watch to begin with, it wouldn’t be worth the effort.
I reviewed the Vostok Amphibian in a previous webWatchWorld review and recently discovered a new trick circulating in the Russian watch forums.
A fellow named Dave Murphy of Murphy Manufacturing (email) makes a stainless steel replacement bezel for the Vostok Amphibia. The bezel comes without an insert, and it just so happens that a Seiko SKX007 bezel insert will fit.

Seiko owners are famous (notorious?) for customizing their watches and an entire industry has evolved with customizers doing some incredible work to turn pedestrian Seiko watches into works of art.

So it makes sense that they have to get their parts somewhere, thus, another sub-culture has evolved, supplying Seiko bezels, inserts, crystals, hands, faces and everything else to Seiko collectors worldwide.
I’m not covering anything new here because the topic of switching out an original Vostok Amphibian (or Amphibia) bezel has been described in the various Russian watch collector forums.
I just thought I’d add some photos and my experience — it’s not a difficult project, but I discovered a few tricks or potential traps. I originally intended to take some video of the process but my new video camera is giving me fits and I gave up in frustration.
But I think the photos and hopefully my description will guide you through the process.
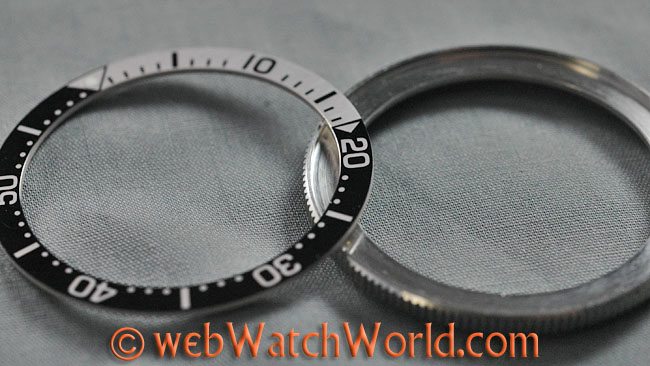
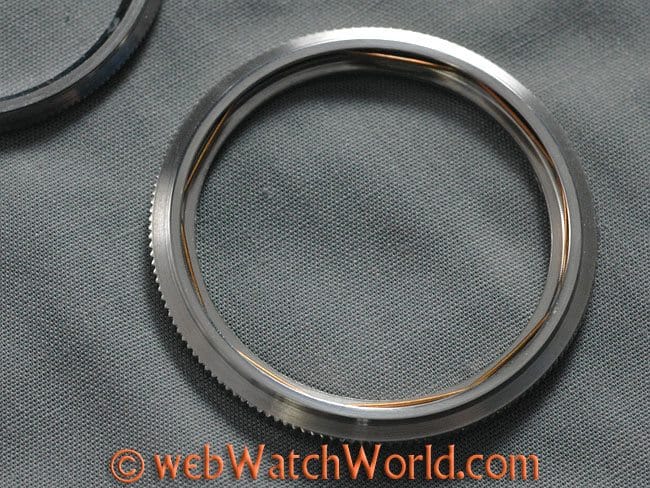
New Bezel and Bezel Insert
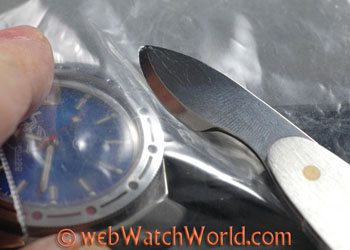
This is a fairly easy project that doesn’t even require special tools, although a watch case back knife comes in handy (photo left, above). But you can use a butter knife (preferably non-serrated) or possibly even a small, thin-bladed screwdriver to pry off the old bezel.
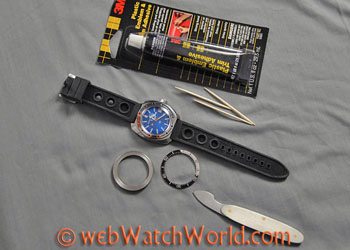
Of course, you’ll also need 1) a new bezel and 2) the bezel insert of your choice. For some reason, this seems to be a misunderstood part of the Vostok Amphibia bezel replacement project, probably because some owners think that all they need is a new bezel.
But Dave Murphy machines the bezels so that you can buy whatever type of insert you’d like, so you can match your Amphibian. And there are many, many inserts to choose from in a variety of colors.
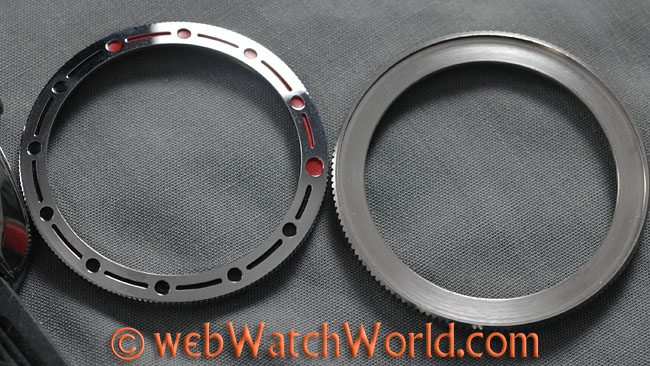
 The bezel costs a fairly steep $40.00 and another $3.00 or so for First Class postage. But remember these are all custom made in a machine shop, and as an ex-machinist, I can tell you that there’s a substantial amount of lathe work and then indexing work to create the very nice serrations along the edge of the bezel.
In fact, I’d guess Dave doesn’t make much money on these after you count his time, the raw materials and the overhead for the machine tools.
Now for the bezel insert. I bought mine from a watch seller who is no longer in business in Hong Kong. They had something like 47 different Seiko bezel inserts, along with another 47 pages of Seiko parts, so choosing your favorite bezel will be the hardest part of this project!
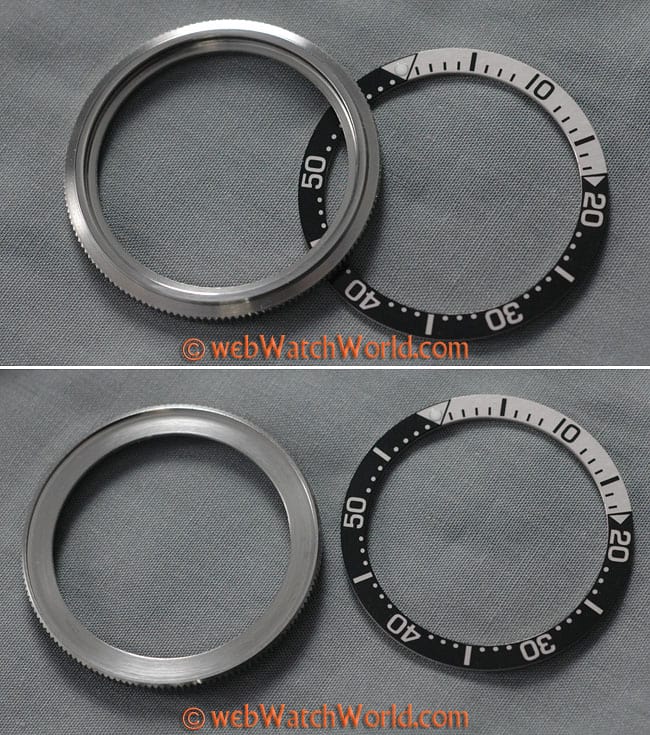
 The bezel insert shown here is the Silver Pepsi Bezel with an inside diameter of 31.5 mm and and an outside diameter of 38.0 mm. Including shipping from Hong Kong, which took a somewhat long 3 weeks, it cost $20.00.
I’m not sure why I chose this particular bezel insert, to be honest. If I did it again, I’d probably choose another. It’s difficult to tell from the photos on the various websites how the bezel inserts will look on your Amphibia and I thought the blue Scuba Dude version needed a bit of silver.
The problem with this insert, as I realized once it arrived, is that the silver countdown section covers what appears to be 17.5 minutes. This seems very odd to me; I’d prefer maybe 15 minutes. But in any case, it’s nicely made with a dot of lume at 12 o’clock.
Note that the numbers on this particular insert are painted, so you’ll need to be very careful when installing it to make sure it doesn’t get scratched. How it will hold up over the long term as I wear the watch remains to be seen.
Parts and Tools Required
I have a knife-style watch back case opener, which I used to pry off the original Vostok Amphibia bezel, but I think you could use a good butter knife or screwdriver tip. Be careful, however.
The only other thing you’ll need is glue. Dave recommends contact cement, but after going to three different stores looking for a small bottle and finding only quart-sized cans, I gave up.
I bought a tube of 3M “Plastic Emblem and Trim Adhesive”, which was the only other non-Super Glue type I could find (Super Glue variants have basically taken over the glue market apparently).
As it turns out, I definitely do not recommend using this glue for this job. It is very “stringy” and sticky, which makes it very difficult to apply without getting strings of glue all over your nice, new bezel…and the bezel insert, and the watch, and the crystal, and the work surface… You get the idea.
I was also a bit hesitant at using contact cement for the same reason I didn’t want to use Super Glue. Contact cement is applied to both mating surfaces, then it must be allowed to dry.
It will feel dry and then it will immediately stick when the two surfaces come in contact. I thought that in case I needed to move the bezel insert around or if I couldn’t get it seated correctly, having the glue stick immediately would be a problem.
As it turns out, this probably isn’t the case, as long as you try first to make sure the bezel insert will fit the bezel before the glue is applied.
By the way, both the bezel and the insert are metal, so you’ll need a glue that will work with metal.
Installing the Bezel Insert In the Bezel
It’s probably a good idea to install the insert in the bezel a few hours before you’re ready to install your new bezel assembly on the watch. This allows time for the glue to dry so you don’t get it all over the watch or, worse, down into the wire or under the bezel.
First, make sure your new insert is a perfect fit in the bezel. Mine fit perfectly, with a tight metal-to-metal fit. Dave says you can sand the insert down if necessary, but I’d be very careful about this; you can easily scratch or remove the painted numbers.
If you need to trim your bezel, you might want to use a very fine emery cloth designed for metal and wrap it around a square piece of wood. It may even be a good idea to use wet/dry emery cloth and wet it first. Be careful to take a little off at a time; go slowly and evenly around the bezel.
Fortunately, my insert was a perfect fit, so this step was unnecessary. Before you test-fit the new insert, make sure everything is clean. You may want to use some rubbing alcohol on a cloth to clean the bezel, then carefully clean the underside of the insert with only the slightest drop of alcohol on a clean cloth.
Test-fit the new bezel insert by pressing it carefully and evenly into the bezel. Don’t force it, although it will take some pressure to get it to seat.
Once it’s in, look into the inside diameter to make sure the insert is seated on to the face of the bezel evenly all the way around. If it is, you probably have a good fit.
Now you’ll have to pry out the insert. Again, be very careful and use a sharp-edged knife, but this is an important step, because you can easily clip off some of the paint on the bezel if the knife slips. Be careful and work around the entire inside diameter.
One the insert is out, it’s time to break out the glue. I used a toothpick to put a tiny bead of the 3M glue on the face of the bezel. If you’re using contact cement, you’ll have to put a thin, even coat on the bezel and then on the back of the insert.
There must be a better glue that doesn’t get all stringy and sticky and I think a glue that requires application on only one side (the bezel, not the insert) would be better because it might be thinner than the two layers of contact cement.
When you’re ready, press the insert down into the bezel again, making sure it’s even all the way around. Depending on the glue used, you may need to keep pressure applied for a few minutes.
I had to keep wiping the strings from the 3M glue off the bezel, but the good thing is that once this glue starts to dry, cleaning the excess was easy by just rubbing it off with my fingers.
Installing the Bezel With Insert on the Vostok Amphibia
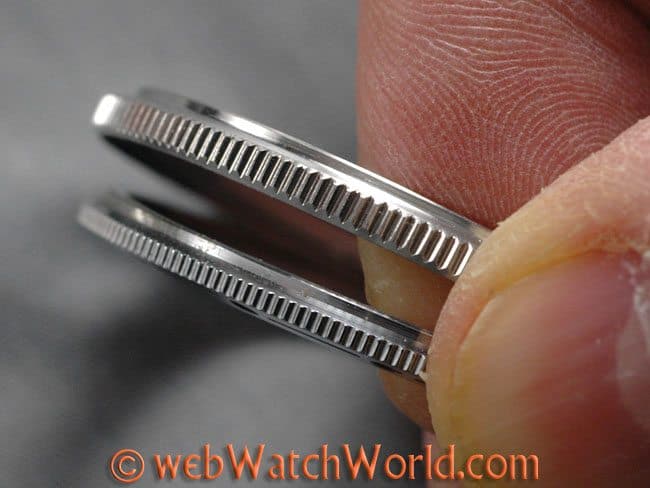
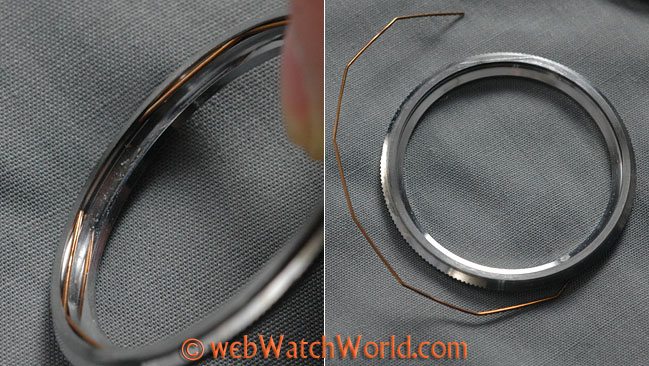
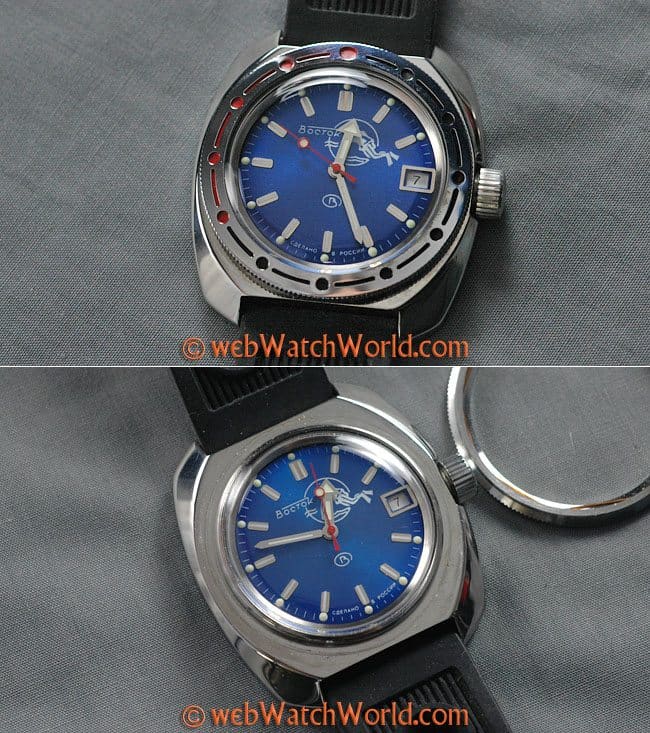
Next, you’ll have to install the wire into the new bezel. You could do this before gluing the insert into the new bezel, but if I had to do it again (as I’m sure I will on my new Vostok Neptune on the way from the Motherland), I’d wait until the glue dries so I can make sure the slot for the wire is perfectly clean.
After making sure everything is clean and dry, work the wire into the slot in the new bezel. Something I realized after I had everything all back together is that there is apparently a tiny hole in the slot that’s supposed to hold one end of the wire — I think.
Make sure the “corners” of the folded part of the wire are correctly and evenly installed into the slot; I had to remove the wire and re-bend it to get it to fit correctly. Each flat and corner should be approximately even — see the photos above.
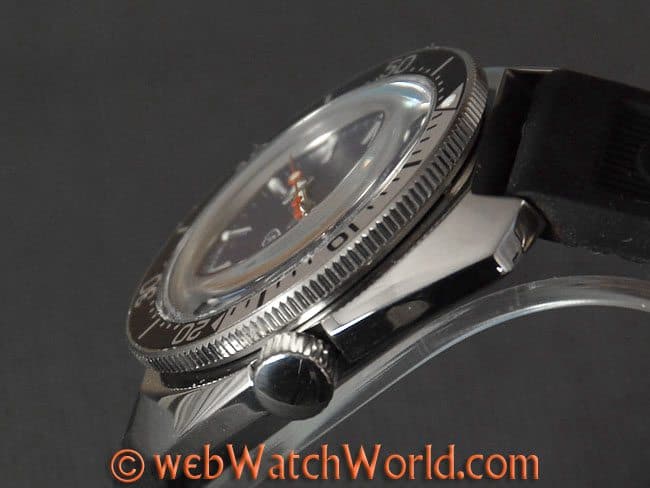
Once the wire is in the new bezel, it’s time to install it on the watch. First, this is a good time to clean any grunge on the watch that collected under the original bezel.
Once everything is clean, run your fingers around the crystal to make sure there are no rough edges.
I found that the best way to install the new bezel is to lay the watch on a flat surface on a thin cloth. Set the bezel on top of the crystal and make sure it is even all the way around, then use two hands to press firmly and evenly — this is important — on to the watch.
It should pop right on but be careful — it’s easy to get one edge hung up on the crystal, and the soft acrylic crystal will get scratched or bunged.
This happened to me and I had to use a fingernail to smooth the edge of the roughened crystal. This is why it pays also to make sure no glue is left inside the bezel.
The bezel should snap on and then carefully inspect around the edges to make sure it looks even. You may have to press again to get it to seat all the way home.
I hate to say it, but my new bezel feels very tight. I may have to pull it off again to see what happened; I think the wire became misplaced and it’s hanging up the bezel, because it’s very difficult to turn.
I may try a drop of light oil first. But to be honest, I really don’t use the bezel so this is for looks only. Live and learn; next time, I’ll know and now you do too!
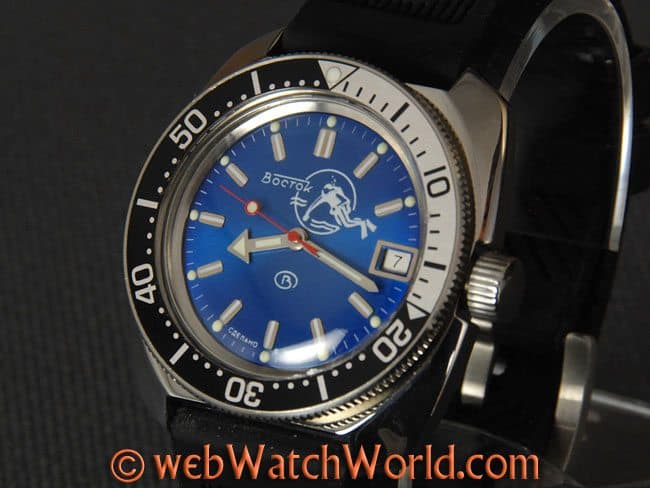
Final Result
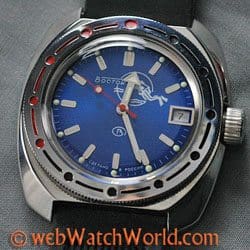
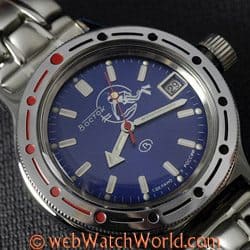
Here are the photos of my Vostok Amphibian with its new bezel. It definitely gives the watch a better look, don’t you think?
Conclusion
Installing a new bezel on a Vostok Amphibian is a relatively easy project as long as you take your time.
The watch looks much better with the new bezel and insert, and the only difference is that the new and thicker bezel makes it slightly more difficult to turn the crown on the Amphibian when setting or winding the watch, because the height interferes slightly with my thumb.
But this is a very minor issue and doesn’t overcome the new look of the watch, which I like very much!


Can this be done to a Vostok 150346 Amphibian?
All the classic Vostok models are pretty much interchangeable, even the movements. The Soviets standardized production standards so that even other brands like Pobeda and Raketa share many common parts.
https://modstok.com is a good place to start if you want to learn more about the possibilities available for your 150. The site has an extensive list of suppliers, so sourcing the parts you need to build the specific watch you want is pretty easy to do. The good news is that Vostok parts aren’t nearly as costly as some other brands.
I’m considering doing a similar mod to a Vostok to build an Explorer I homage. Murphy Manufacturing also makes a polished pilot bezel that fits the classic Vostok models, as do a few other manufacturers. With a dial and hand swap, I think I can build a watch with a similar look for about what a cheap Explorer knockoff costs and have a much more dependable timepiece for EDC.
Here’s a tip for anyone else who plans to replace a bezel insert. Most suppliers also sell pre-cut, double-sided tape for mounting bezels, so you can avoid using adhesive altogether. This seems to be the industry standard the manufacturers are using – I found tape on the bezel of my 15-year-old Seiko SND253 when I removed the insert a few weeks ago.
Nice write-up. Is this the same watch currently sold on Amazon? I like the blue dial on this one, and love the new look after the bezel swap. The one I’m looking at on Amazon seems to have a greenish-blue dial. I prefer the color in the photos in this write-up.
Apologies, meant to include the current link – https://www.amazon.com/dp/B07ZFKJQYB/